Big red bold text
Small blue italic text
Underlined text
You might have noticed that all the html we’ve written so far has been pretty plain and boring. The web does not look like the examples we have made, it is styled, with vibrant colors, images, animations and many more bits and bobs.
Well, today we are going to take a step in into the world of styling HTML. We will learn about the different ways to style HTML elements: inline styles, internal styles, and external styles and we will go over in detail about inline styles. Other ways of styling will be covered in the CSS course .
What is Inline Styling?
And why are the called “inline”? Well, because they are defined on the line the apply to in a special attribute called style. This attribute allows us to apply CSS styles directly to an HTML element. This is known as inline styling.
The styling in any HTML document is done using a language called CSS (Cascading Style Sheets). Inline styling is just one way to apply CSS styles to HTML elements direclty in the HTML code.
The inline styles are just key=value pairs, but strigified in a single string. The key is the CSS property, and the value is the value of that property. For example, color: blue; sets the text color to blue.
<tagname style="key: value;>Content</tagname>.
You can visualize them as such:
{
  "color": "blue",
  "font-size": "20px"
}
To style an element using inline styles, you add the style attribute to the HTML tag and specify the CSS properties and values you want to apply. For example:
<p style="color: blue; font-size: 20px;">This is a styled paragraph.</p>This is a styled paragraph.
Other examples of inline styles:
<h2 style="text-align: center; color: red;">Welcome to My Website</h2>
<p style="font-family: monospace, sans-serif; line-height: 1.5;">
  This is a paragraph with custom styling.
</p>
<div style="background-color: lightgray; padding: 10px; border-radius: 5px;">
  This is a styled div element.
</div>
Welcome to My Website
This is a paragraph with custom styling.
Most Common CSS Properties
Here are some of the most common CSS properties you can use with inline styles:
color: Sets the text color.
<p style="color: blue;">This text is blue.</p>This text is blue.
font-size: Sets the size of the font.
<p style="font-size: 20px;">This text is larger.</p>This text is larger.
font-family: Sets the font family.
<p style="font-family: monospace, sans-serif;">
  This text uses a monospace font.
</p>
This text uses a monospace font.
The font-family property allows you to specify the font used for the text. In a text editor like MS Work, Google Docs or Apple pages, the font can be changed by a dropdown. This is the same thing. You can use any font that is available on the user’s system or a web font. Common font families include Arial, Verdana, Times New Roman, and Courier New. You can also use multiple font families as fallbacks, like font-family: Arial, sans-serif;, which will use Arial if available, or fall back to a generic sans-serif font if not. The monospace font family is often used for code snippets or technical content, as it displays characters in a fixed-width format and is another fallback.
background-color: Sets the background color of the element.
<div style="background-color: lightgray;">
  This div has a light gray background.
</div>
This div has a light gray background.
text-align: Sets the alignment of the text (e.g., left, center, right).
<p style="text-align: center;">This text is centered.</p>
<p style="text-align: right;">This text is aligned to the right.</p>
This text is centered.
This text is aligned to the right.
margin: Sets the space outside the element.
<p style="margin: 20px; background: gray;">
  This paragraph has a margin of 20 pixels.
</p>
<p style="margin: 10px 0; background: gray;">
  This paragraph has a vertical margin of 10 pixels.
</p>
<p style="margin: 0 auto; width: 50%; background: gray;">
  This paragraph is centered with a width of 50%.
</p>
This paragraph has a margin of 20 pixels.
This paragraph has a vertical margin of 10 pixels.
This paragraph is centered with a width of 50%.
padding: Sets the space inside the element.
<p style="padding: 10px; background: lightblue;">
  This paragraph has padding of 10 pixels.
</p>
<p style="padding: 5px 10px; background: lightblue;">
  This paragraph has horizontal padding of 10 pixels and vertical padding of 5
  pixels.
</p>
<p style="padding: 0 20px; background: lightblue;">
  This paragraph has horizontal padding of 20 pixels.
</p>
This paragraph has padding of 10 pixels.
This paragraph has horizontal padding of 10 pixels and vertical padding of 5 pixels.
This paragraph has horizontal padding of 20 pixels.
You can use both margin and padding on an element. The padding, just like in read life, is laid inside the element. Thick of every element as a box, and when you set a padding - you set insulation from within the box. The margin is the space outside the box, which tells it to stay away from other boxes. You can use both properties together to create space around and inside an element.
<p style="margin: 20px; padding: 10px; background: lightgreen;">
  This paragraph has a margin of 20 pixels and padding of 10 pixels.
</p>
This paragraph has a margin of 20 pixels and padding of 10 pixels.
border: Sets the border around the element.
<p style="border: 2px solid black; padding: 10px;">
  This paragraph has a 2-pixel solid black border.
</p>
This paragraph has a 2-pixel solid black border.
Borders can be styled in various ways, such as solid, dashed, or dotted. You can also set the border width, style, and color separately:
<p
  style="border-width: 2px; border-style: dashed; border-color: red; padding: 10px;"
>
  This paragraph has a 2-pixel dashed red border.
</p>
<p
  style="border-top: 1px dotted blue; border-right: 2px double red; border-bottom: 3px solid green; border-left: 4px solid yellow;"
>
  This paragraph has many borders on every side.
</p>
This paragraph has a 2-pixel dashed red border.
This paragraph has many borders on every side.
Content box
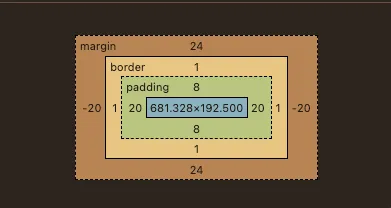
This is how an element looks like with all borders, paddings, margins widths and heights.
The box has margin on all 4 sides, then the border, again on all 4 sides, then the padding (4 sides) and finnally the content box, which is the actual content of the element. The content box is the area where the text or other content is displayed. The width and height of the content box can be set using the width and height properties.
More properties
You do not need to remember all the properties, but here are some more common ones that we will go over in the CSS course:
| Property | Description |
|---|---|
color | Sets the text color. |
font-size | Sets the size of the font. |
font-family | Sets the font family. |
background-color | Sets the background color of the element. |
text-align | Sets the alignment of the text (e.g., left, center, right). |
margin | Sets the space outside the element. |
padding | Sets the space inside the element. |
border | Sets the border around the element. |
width | Sets the width of the element. |
height | Sets the height of the element. |
opacity | Sets the transparency of the element (0 is fully transparent, 1 is fully opaque). |
box-shadow | Adds a shadow effect around the element’s box. |
text-decoration | Sets the decoration of the text (e.g., underline, line-through). |
cursor | Sets the type of cursor to be displayed when hovering over the element. |
display | Sets how the element is displayed (e.g., block, inline, flex). |
z-index | Sets the stack order of the element (used with positioned elements). |
overflow | Sets how to handle content that overflows the element’s box (e.g., visible, hidden, scroll). |
position | Sets the positioning of the element (e.g., static, relative, absolute, fixed). |
float | Sets the element to float to the left or right of its container. |
clear | Sets whether an element can be next to floating elements or must be below them. |
FYI
How to add the other types of styles:
- Internal styles: You can add styles to the
<head>section of your HTML document using the<style>tag. This allows you to apply styles to multiple elements without repeating thestyleattribute.
<!doctype html>
<html>
  <head>
    <title>My First HTML Page</title>
    <style>
      p {
        color: blue;
        font-size: 20px;
      }
      h2 {
        text-align: center;
        color: red;
      }
    </style>
  </head>
  <body>
    <h2>Welcome to My Website</h2>
    <p>This is a styled paragraph.</p>
  </body>
</html>
Or you can link a separate CSS file using the <link> tag in the <head> section:
<!doctype html>
<html>
  <head>
    <title>My First HTML Page</title>
    <link rel="stylesheet" href="styles.css" />
  </head>
  <body>
    <h2>Welcome to My Website</h2>
    <p>This is a styled paragraph.</p>
  </body>
</html>Both of these methods use selectors which are specific word patterns that target specific HTML elements. For example, the p selector targets all <p> elements, and the h2 selector targets all <h2> elements. Inline styles do not use selectors, as they are applied directly to the element.
We will cover selectors in detail in the CSS course .
Recap
Inline styles are a quick way to apply CSS styles directly to HTML elements using the style attribute. They allow you to customize the appearance of elements without needing to create separate CSS files or internal styles. However, inline styles can make your HTML code less readable and harder to maintain, so it’s generally recommended to use them sparingly and consider using external or internal styles for larger projects.
Inline styles have the highest specificity (priority), and will override any other styles. More on that in the CSS course .

About the author
Vasil Kostadinov


Software developer, specializing in React, Next.js and Astro for the frontend, as well as in Supabase and Strapi for the backend. Creates content in all shapes & sizes in his free time.